My Goals
- Thin, crisp-tender crust
- Evenly browned crust
- Fast-cooking toppings that don’t sog out the crust
Published July 1, 2016.

I like to host pizza parties year-round, but come summertime the last thing I want to do is crank up the oven and cook in a hot kitchen. That’s when I opt to grill pizza. Not only does this approach allow me to move both the kitchen and the party outdoors, but when made well, the pie is a lighter and fresher style of pizza, perfect for summer appetites: a thin, audibly crisp, lightly charred crust that’s tender within and topped judiciously (so as not to saturate the crust) with a simple tomato sauce, pockets of cheese, and fresh herbs.
My standards for grilled pizza are admittedly high, since I was introduced to this style at Al Forno in Providence, Rhode Island, the restaurant where the dish is said to have been invented more than three decades ago. There, the pies are cooked on a custom-made wood-fired grill, which produces a gorgeously charred, crisp-tender oblong crust that the kitchen tops with alternating islands of bright, well-rounded tomato sauce and gooey melted cheese, a few shallow pools of rich olive oil, and zippy raw scallion curls.
But as proficient as I am at baking pizzas, I’ve found it much trickier to grill one. That’s because unlike an oven, which browns pizza from both the bottom and the top, a grill cooks pizza entirely from the bottom, which leaves the top soft and blond and the toppings undercooked, even when the grill is covered. To brown the second side, many recipes call for flipping the dough before applying any toppings, but I’ve found that this also causes the dough to puff up from edge to edge—more like a flatbread than pizza.

The grill at Al Forno solves this problem because it features a brick enclosure that absorbs heat and then reflects it back onto the top of the pie, much like an oven would. Without that setup, I’d need to test other ways to achieve the results I was after.
When we tried grilling our conventional pizza dough, we were met with a number of problems. Instead of the thin, even crust we were after, we ended up with a thick, bubbly flatbread.
DOESN’T SPREAD
Too little water in our conventional dough makes it impossible to roll it as flat as we wanted.
PUFFS UP
Too much yeast causes large air pockets to form and the crust to bubble as it cooks on the first side.
BROWNS UNEVENLY
The bubbling gives the top side an uneven surface that, when flipped, doesn’t lie flat on the cooking grate.
Grilling the dough on both sides was a must if I wanted flavorful browning on the top and bottom, so I focused my first tests on keeping the dough flat. I used our Thin-Crust Pizza dough as a jumping-off point; it’s a mixture of bread flour, instant yeast, water, vegetable oil, salt, and sugar that comes together in minutes in the food processor and stretches beautifully without tearing or springing back. It also boasts a tight crumb with complex flavor thanks to a prolonged fermentation in the fridge, where the dough’s yeast produces sugars, alcohol, and acids. As for the grill setup, for now I’d cook the pies on a gas grill with all the burners set to high and revisit the method later if necessary.
Back to the puffiness issue: I wondered if the solution might be as simple as pressing the dough as thin as possible, which I tried with both my hands and a rolling pin. But neither of the mechanical methods worked: No matter how thin I stretched it, the dough inevitably puffed back up once it hit the grill. My only recourse was to try tweaking the dough formula itself. First I halved the amount of yeast, which did minimize the air bubbles but didn’t make the dough easier to stretch. What I really needed was a looser dough that would naturally spread more, so I gradually upped the amount of water until the dough was soft enough to stretch into a thin sheet but not so wet that it was soupy. The difference—an extra ½ ounce of water—made for a dough that not only stretched thinner and puffed less but also boasted a moister, more tender crumb.


But adding more water presented a catch-22: The wetter dough was stickier and required a liberal dusting of flour to keep it from clinging to my fingers and the grill grates (which I’d already oiled generously), but more flour made the exterior of the crust leathery and tough.
Stumped, I arranged a visit with Al Forno’s executive chef, David Reynoso, hoping there was more to the restaurant’s great results than the custom grill. And as it turned out, there was a subtle but significant difference to his method. Rather than stretching the dough in flour, he did so in a generous amount of olive oil. It made sense, as the fat not only kept the dough from sticking but essentially fried the exterior a bit and helped it crisp: As water in the dough’s exterior is driven away by the high temperatures, the starch molecules lock into place, forming a rigid, brittle network with a porous, open structure.
Back at work, I whipped up another batch of dough. This time I poured ¼ cup of olive oil onto a rimmed baking sheet, dipped both sides of the dough ball into it, and then used my palms to stretch and spread the dough into a thin oval sheet that measured roughly 16 by 12 inches, just about filling the pan. It was a little messy, but the dough stretched easily beneath my hands and peeled cleanly from my fingers and the grates: So far so good. The finished product was proof that using lots of oil was well worth it: This pie was thin, tender, and richly flavorful, with a crisp shell—and it wasn’t the least bit greasy.
Stretching the dough in a generous amount of olive oil not only prevents it from sticking to your hands and to the cooking grate but also crisps the exterior without rendering it greasy.
I should clarify that these pies had cooked nicely on a gas grill with the lid closed, but when I tried mimicking the results over a single-level charcoal fire, things got trickier. Simply put, it was much harder to maintain even heat over the entire surface, and the bottom of the crust tended to burn in the center before the outer edges had browned and the cheese had melted.

It wasn’t that the fire was too strong; I proved that to myself when I reduced the amount of charcoal and the same bull’s-eye effect happened, only more slowly. The problem was the shape of the kettle grill; even though the coals were spread in an even layer, the curved walls reflected heat and created a hot spot at the very center. The solution was to make the shape of the grill work in my favor by arranging the coals in a ring around the exterior of the grill with a void at the center; that way, the concentrated heat on the outside edge would reflect in. With that setup, I was able to achieve a more-even spread of heat from edge to edge.

HOTTER AT THE CENTER
A single-level fire concentrates both direct and indirect heat in the center of the grill, burning the pizza.

EVEN ALL OVER
A ring of coals heats the grill center through reflected heat, avoiding the creation of a hot spot.
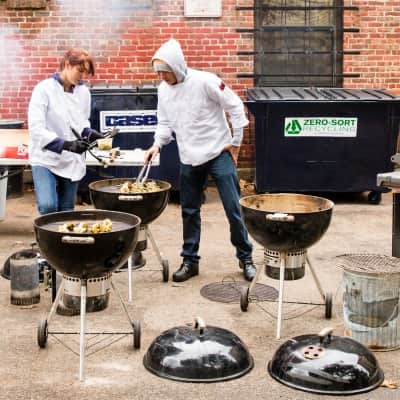
However, this setup meant that I could cook just one pie at a time. But this was just as well: I’d also realized during testing that grilled pizza is more ephemeral than other styles and goes from perfectly crisp to limp in minutes, so serving one at a time was better. Going forward, I made sure to have everything I needed—all three sheets of stretched dough, sauce, cheese, and tools—at the ready so that I could cook and serve the pies as quickly as possible. In fact, it was best to pargrill all three pies before topping, grilling, and serving them one by one.
Grilled pizza cooks quickly and is best eaten right away, so be sure to have everything you’ll need at the ready:
With my dough and my cooking method locked down, it was time to turn my attention to finessing the toppings, which, up to this point, had been just a coarse puree of whole tomatoes and seasonings along with some shredded mozzarella. The sauce needed nothing more than a little olive oil and sugar to balance the tomatoes’ bright acidity, but the cheese, which was a tad bland and had never fully melted in previous tests, needed rethinking. After a few tests, I switched from the block mozzarella we typically use on pizza to the softer, faster-melting fresh kind and supplemented it with salty-sharp finely grated Parmesan.
I was also strategic about how and when I added the toppings: First, I applied a thin but even layer of Parmesan (plus a little more olive oil), which created a flavorful barrier against the other toppings’ moisture, ensuring that the crust would stay crisp. Since slathering the thin dough with sauce and cheese would surely thwart crispness, I instead dolloped spoonfuls of sauce (warmed on the stove first to ensure it would be piping hot by the time the pizza was done) over the pargrilled dough surface, along with bite-size pieces of the mozzarella. I slid the pie back over the heat for 3 to 5 minutes to crisp up the crust and cook the toppings, checking the underside and rotating the pizza as necessary to make sure that it browned evenly. When it came off the grill, I finished it with chopped fresh basil, one more drizzle of oil, and a bit of coarse salt for crunch.

This was the closest replica of the Al Forno pie that I’d ever had: a crisp-tender crust that boasted richness from that oil bath and just a touch of smoke and char, simply and judiciously covered with pockets of bright, balanced sauce and just enough gooey cheese. It didn’t need any other toppings (though applying certain fresh items that don’t weigh down the pie after cooking is fine) and was as addictive to eat as it was fun to make.
Thin, crisp-tender crust
A dough made with very little yeast and a lot of water doesn’t puff up during cooking and spreads easily into a thin sheet. Stretching the dough in a generous amount of olive oil (rather than flour) prevents it from sticking to your hands or the grill and coats the exterior so that the dough crisps as it cooks.
Evenly browned crust
Arranging the coals in a ring around the perimeter of the kettle, rather than evenly across it, creates a more even layer of heat and prevents the formation of a hot spot in the center that would burn the crust.
Fast-cooking toppings that don’t sog out the crust
Scattering a thin layer of finely grated Parmesan over the pargrilled dough creates a flavorful barrier that prevents the sauce's moisture from rendering the crust soggy. Dolloping the sauce (warmed ahead of time so that it’s hot by the time the pizza is cooked) and scattering chunks of fast-melting fresh mozzarella over the dough, rather than covering the pie in sauce and cheese, also helps it stay crisp.

This is a members' feature.