When freezing food, air is the enemy. Freezer burn, indicated by ice crystals and brownish-white discoloration, happens when frozen food is exposed to air and dehydrates and oxidizes. Here’s how to ensure the best texture and flavor.
How to Freeze Common Foods
Too often, that extra half-can of tomato paste or handful of chopped onion gets thrown away. We tested dozens of ingredients to see which we could freeze for future use.
Published Nov. 7, 2018.

Jump to a Section
Freezing: Tips for Success
Keep Your Freezer Cold
The quicker foods freeze, and the fewer fluctuations in temperature once frozen, the better. Your freezer should register 0 degrees Fahrenheit or colder; use a thermometer to check. A survey of test kitchen staff's home freezers showed temps ranged from 5 degrees to -10 degrees. Make sure your freezer is at the coldest possible setting (unlike your fridge, where the coldest setting is normally too cold).
Portion Liquids
Liquids can be frozen in ice cube trays and then transferred to a zipper-lock bag.
Minimize Headroom
In hard-sided containers, fill to ½ inch from the top and place plastic wrap on the food’s surface before attaching the lid.
Double Wrap
For solid foods you’re wrapping in zipper-lock bags, first wrap in plastic wrap and then put the food in the bag, pressing out as much air as possible before sealing.
Maximize Airflow
To help cold air circulate, keep food away from freezer vents. For more efficiency and to maintain colder temperatures, vacuum filters and coils of your refrigerator/freezer periodically (unplug your fridge before doing so).
How to Freeze Pantry Items
These pantry ingredients can be frozen and thawed with virtually no noticeable change in quality.
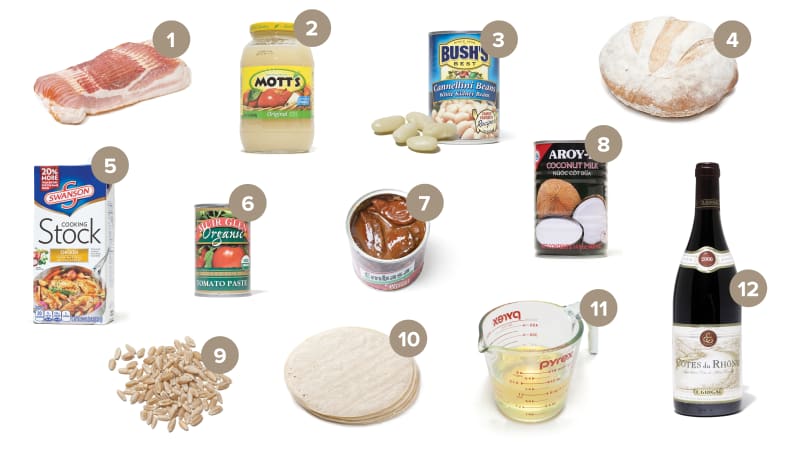
1. Anchovies, Bacon
Prep: Coil up individually (to prevent sticking and to minimize surface area for freezer burn), freeze on plate, and transfer to zipper-lock bag.
2. Applesauce
Prep: Portion in ½ - to 1-cup containers to freeze; transfer to zipper-lock bag.
3. Beans (Soaked and Canned)
Prep: Rinse soaked dried beans (we brine ours for better flavor and texture) and drain canned beans. Pat all beans dry with paper towels and transfer to zipper-lock bag. To save space, lay flat to freeze. Cooked homemade beans don’t freeze as well as canned beans; the latter contain calcium chloride, which protects against ice crystal damage.
4. Bread
Prep: Wrap sliced loaves tightly in plastic wrap, wrap unsliced loaves in foil, and seal each in zipper-lock bag. Thaw individual slices at room temperature; no need to thaw slices before toasting. Place frozen loaves, still wrapped in foil, in 450-degree oven for 10 to 15 minutes; remove foil and return loaves to oven for 1 to 2 minutes to crisp crust.
5. Broth
Prep: For smaller amounts, freeze in ice cube trays or muffin tin cups; transfer to zipper-lock bag. For larger portions, line 4-cup liquid measuring cup with zipper-lock bag and pour in broth. Seal bag, seal in second bag if desired, and lay flat to freeze.
6. Canned Tomato Paste
Prep: Open ends of can, push out paste, and freeze in zipper-lock bag. Cut off only as much as needed from frozen log.
7. Chipotle Chiles in Adobo Sauce
Prep: Freeze spoonfuls of chiles and sauce on parchment paper-lined baking sheet; transfer to zipper-lock bag.
8. Coconut Milk
Prep: Portion into ½ - to 1-cup containers to freeze; transfer to zipper-lock bag. After thawing, process with immersion blender for 30 seconds to re-emulsify before use.
9. Cooked Grains
Prep: Spread cooked grains (we tested wheat berries and long-grain white and brown rice) on baking sheet to cool, transfer to zipper-lock bag, and lay flat to freeze. No need to thaw before use.
10. Tortillas
Prep: Separate corn or flour tortillas with waxed paper or parchment paper and place in zipper-lock bag. To thaw, defrost stacks of 3 to 4 tortillas in microwave at 50 percent power, 10 to 20 seconds per stack.
11. Used Frying Oil
Even strained, used frying oil contains microscopic particles of food that make it go rancid quickly at room temperature.
Prep: Freeze in airtight containers.
12. Wine
Prep: Freeze 1-tablespoon portions in ice cube tray; transfer to zipper-lock bag. Use only in cooking since freezing causes many of wine’s organic compounds to precipitate out as solids (heat reintegrates them).
How to Freeze Dairy and Eggs
We found that freezing dairy products and eggs didn’t affect flavor, only texture. Liquids seemed thinner and separated; yogurts and some cheeses were grainy. That’s because freezing causes the water and proteins to separate; the water then forms ice crystals while the proteins clump. Blending liquids with an immersion blender will eliminate some but not all clumps, so it’s best to use thawed dairy in baked goods where it’s not a primary ingredient. (Freezing also separates water and protein in egg yolks. But we came up with a great fix: stirring a simple syrup into the yolks. The dissolved sugar interferes with ice crystal formation and also prevents clumping.)

1. Cream Cheese
Prep: Seal in zipper-lock bag. Don’t use as spread or in recipes where grainy texture will be noticeable, such as in cheesecake. Fine for biscuits and pound cake.
2. Cultured Dairy (Buttermilk, Sour Cream, Yogurt)
Prep: Portion in ½ - to 1-cup containers to freeze: transfer to zipper-lock bag. Not good for custards, puddings, and most uncooked applications. Greek yogurt is the exception—since freezing thins its texture, it can be swapped for regular yogurt in uncooked recipes. Thawed buttermilk mixes well in salad dressings that include emulsifying agents (e.g. mayonnaise).
3. Eggs
Whites: Freeze individually in ice cube trays; transfer to zipper-lock bag. Thawed whites will whip more quickly than fresh since freezing begins the process of unwinding their proteins that whipping continues.
Yolks: Prepare syrup of 2 parts sugar to 1 part water; stir into yolks using ¾ teaspoon syrup per 4 yolks. Syrup will not impart noticeable sweetness; yolks are fine even for savory applications such as hollandaise sauce.
4. Hard and Semisoft Cheeses
Prep: Wrap cheese (cheddar, Brie, Pecorino Romano, mozzarella, and Parmesan all freeze well) tightly in foil; seal in zipper-lock bag.
5. Milk and Cream
Prep: Portion in ½- to 1-cup containers to freeze; transfer to zipper-lock bag. Avoid using in uncooked applications; custards and puddings; and coffee, cocoa, and other hot beverages. Fine for baked goods and mashed potatoes. Thawed heavy cream can be whipped but use it immediately or it will start to weep.
How to Freeze Produce
Freezing alters the texture of many types of produce, but their flavors can remain remarkably intact.

1. Bananas
Prep: peel and then seal in zipper-lock bag. Best for quick breads (thaw first) and smoothies (keep frozen). Avoid pies, puddings, or any recipe where banana needs to hold its shape.
2. Citrus Zest
Prep: Freeze in packed ½-teaspoon mounds on baking sheet; transfer to zipper-lock bag. Avoid using as garnish since color fades.
3. Chopped Onions
Prep: Seal in zipper-lock bag. Freezing turns onions mushy. Use only in cooked applications (no need to thaw first).
4. Garlic
Prep: Mince garlic, combine with ½ teaspoon vegetable oil per clove, and freeze in heaping teaspoons on baking sheet. Transfer to zipper-lock bag.
Cut Garlic and Onions Before Freezing
When cut, garlic and onions each release the same enzyme that reacts with their sulfur compounds to produce their characteristic pungent flavors. Because freezing reduces the activity of this enzyme, it needs to be able to do its job and produce the compounds before the garlic and onions go into the freezer, where the flavors will be preserved. There is one notable difference in how we freeze them: We coat garlic in oil to protect its pungent flavor compounds from oxidation. Onions contain an extra enzyme that does this job, so there’s no need for the oil.
5. Fresh Herbs
Prep: Chop parsley, basil, tarragon, or cilantro; transfer by spoonful to ice cube trays, top with water, and freeze. Transfer to zipper-lock bag. Add frozen cubes directly to soups, sauces, and stews. Herb flavor won’t be quite as strong as when fresh.
6. Ginger
Prep: Grate ginger (frozen whole ginger turns spongy), freeze in 1-teaspoon portions on baking sheet, and transfer to zipper-lock bag.
Five Ingredients to Always Freeze
There are a few ingredients that we always put directly in the freezer to preserve freshness and flavor and prevent spoilage.
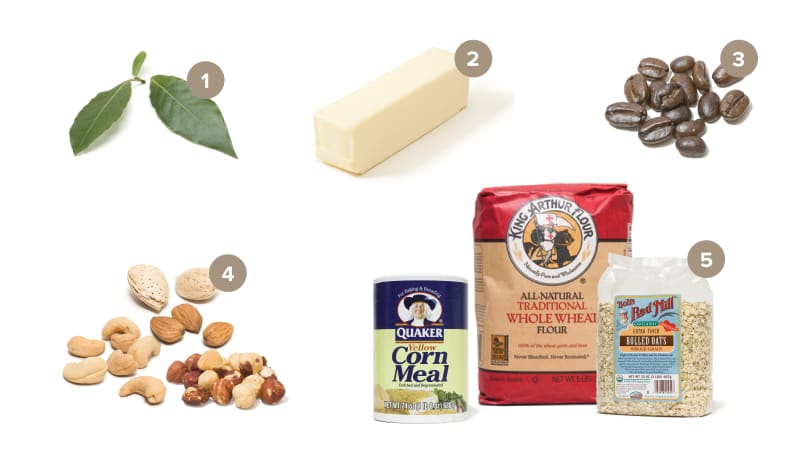
1. Bay Leaves
Stored in the freezer for three months, bay leaves were far more flavorful than those stored at room temperature for the same amount of time.
2. Butter
If kept in the fridge longer than a month, even unopened sticks of butter can pick up off-flavors. Freeze extra sticks sealed in a zipper-lock bag.
3. Coffee Beans
Unless coffee beans are sealed in unopened, airtight containers, their flavor deteriorates noticeably after 10 days at room temperature. Before freezing, portion extra beans in one-day allotments to minimize exposure to air and moisture.
4. Nuts
The high fat content of nuts means that they can turn rancid surprisingly fast at room temperature. There’s no need to thaw them before use.
5. Whole Grain Flours, Oats, and Cornmeal
Freezing prevents fats in whole grains from oxidizing and producing off-flavors; transfer items to airtight containers first. Bring them to room temperature before baking with them.
Keep a Record of What You Freeze
Storing leftovers in the freezer is great—until you forget about them. To keep track of what you have, affix a dry-erase board to the freezer and make notes when you add (or remove) items. Adding dates also reminds you to use up older items.
