My Goals
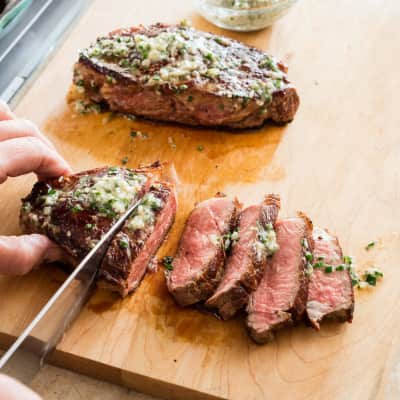
- A well-browned, even sear on the outside of the steak that’s not too thick or dried out
- An evenly cooked interior, with no gray band of overcooked meat just under the surface
Published Sept. 28, 2016.

Despite cast iron’s many virtues, you can’t just plunk a steak into the pan and expect success.
I have long been a fan of cooking in cast iron. So when I set out to develop a recipe for a great steak—one with a perfectly seared exterior and an interior that was evenly cooked from edge to edge—of course I turned to my great-grandmother’s well-worn Wagner cast-iron skillet.
After an initial round of testing, though, I had found out a little secret: Despite cast iron’s many virtues, you can’t just plunk a steak into the pan and expect success. The recipes that I tried produced varied results, but none of them were encouraging. There were steaks with burnt exteriors and raw interiors and steaks with pale exteriors and overcooked interiors, and the browning was uneven across the board.
I decided to take a step back and investigate the cast-iron skillet a little more. It’s said to produce a great seared steak because it retains heat well, but I suspected there was more to it than that. I knew from previous test kitchen testing that cast iron does not heat up evenly, and that seemed likely to be the root of the problem with the recipes I tried. I wanted to know just how unevenly cast iron heats and whether there was a way I could fix that.
I started by pitting cast-iron skillets against stainless steel–clad skillets to see how the heat was distributed in each. I lightly dusted both types of skillet with flour—since I wanted to be sure that the evenness of heating was not due to any inherent quality of the heat source—and, without any preheating, set the skillets over gas, electric, and induction burners at both medium and medium-high heat. The results were consistent for all three types of heat: evenly toasted, nicely golden-brown flour in the steel-clad skillets, and in the cast-iron skillets, pale flour with black splotches marking the places where the heat source actually came into contact with the pan.
Cast iron doesn’t heat as quickly as stainless steel–clad cookware because its thermal conductivity—the ability to transfer heat from one part of the metal to another—is lower. But it holds heat much more effectively; even when a relatively cool steak is added, the pan’s temperature drop is minimal and the steak browns better. The trick is to make sure that the pan preheats thoroughly and evenly, which we do in a very hot oven (not on the stovetop) because the convective heat minimizes hot spots. Once the pan is hot, we set it over a moderate flame to maintain the heat and to avoid creating an overly thick crust.
Heating flour in cast-iron and stainless-steel skillets illustrates the difference between the two: In the cast-iron skillet, the flour burns in spots while remaining raw in others; in the stainless-steel skillet, it browns more evenly.
But, I thought, since the dark spots were more well defined over medium-high heat than medium heat, maybe the heat level was the problem. To find out, I heated a cast-iron skillet over small and large gas flames, as well as over electric and induction burners. I took the temperature at the center, 3 inches off center, and at the inside edge of the skillet every 30 seconds for about 10 minutes during each test. The results confirmed what I was seeing with the flour test: No matter the level of heat or its source, the skillet had hot and cool spots.
Our science editor explained that most stainless steel–clad cookware is made up of layers of stainless steel around a core of aluminum, which conducts heat about 2½ times better than cast iron. Therefore, the heat moves across the skillet very easily. Since heat doesn’t move as easily across cast iron, the skillet initially develops hot spots where it is directly touching the heat source.
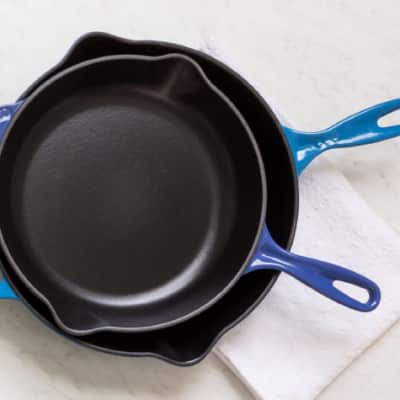
Out of the 10 cast-iron skillets we tested, the Lodge Classic Cast Iron Skillet was our favorite. It arrived slick and only got better with use.
But I realized there was a change that could provide a solution: heating the pan in the oven. It would take a little longer, but because the oven’s heat is not concentrated on a single part of the pan but rather comes at the pan more or less evenly from all directions, it guaranteed an evenly heated pan. An added advantage was that the oven could be set to a specific temperature, no matter what the heat source, whereas when using the stovetop I had found it difficult to accurately specify a single burner setting that worked across all types of heat sources.
Because the oven’s heat is not concentrated on a single part of the pan but rather comes at the pan more or less evenly from all directions, it guaranteed an evenly heated pan.
But what was the best oven temperature? My goal was to get the skillet hot enough so that vegetable oil, which has a smoke point of between 400 and 450 degrees, would start to smoke as soon as I added it to the skillet. I put the skillet in the cold oven, as there was no sense in waiting for the oven to heat before adding the skillet, and set the oven temperature to 400 degrees. However, when I added the oil after heating the skillet, it took some time to start smoking. I continued to test temperatures at 25-degree intervals, pulling the skillet out and searing steaks, and eventually worked my way up to 500 degrees, which I found to be the ideal setting.
Now for the steak itself. I chose thick boneless strip steaks because they have big, beefy flavor and are easy to find. Salting the steaks and letting them sit while my pan heated in the oven would not only season the meat throughout but also help keep it moist and juicy. Patting them dry before searing helped them brown even more.
My next question was how much oil to use—and it turned out that I needed more than I thought I would. As meat cooks, it contracts; any ridges or divots get bigger, and without oil, they don’t touch a heat source, resulting in a spotty brown steak rather than a gorgeously browned one. I settled on 2 tablespoons of oil, a hefty but necessary amount.
Two problems remained: I was still getting a rather large gray band, the area between the crust and interior that dries out and turns chalky. And my beautifully preheated pan was so hot that the crust it produced was actually too good—it was too thick and almost unpleasantly crunchy. To eliminate the gray band, one of my coworkers suggested that I try flipping the steak more often (I had been flipping it only once). The idea made sense, since each time a steak is flipped, the side not touching the skillet cooks with residual heat, which penetrates the meat more slowly, resulting in a smaller gray band. I wondered if flipping might also help prevent an overly thick crust. I found that flipping once every 2 minutes was just the right amount to ensure a perfectly rosy interior, but the crust was still thicker than I liked.

USE LOTS OF OIL
A generous 2 tablespoons of oil keeps the steak (which contracts during cooking) in contact with the heat, for more even browning.

TURN THE HEAT DOWN
After the initial sear, reduce the flame to medium-low; the pan will stay hot enough to sear the meat.

FLIP REPEATEDLY
Turning the steak every 2 minutes prevents a gray, overcooked band from forming under the surface.
Then I did something I never thought I would do when searing: I turned down the heat. Because the cast iron retained the heat so well once it got up to the proper temperature, turning down the heat actually maintained the temperature I wanted, whereas keeping the heat high increased the skillet’s temperature as time went on. So I got a great initial sear over medium-high heat and then reduced the heat until I found a sweet spot: about 8 minutes over medium-low heat. Combined with flipping every 2 minutes, this produced a perfect, gorgeously browned crust and a rosy interior from edge to edge.
The steak was now fantastic on its own, but a simple accompaniment would make it that much more special. Mixing up a compound butter to melt over the resting steaks was easier than making a pan sauce and was just as flavorful.
A well-browned, even sear on the outside of the steak that’s not too thick or dried out
Heating the cast-iron skillet in the oven instead of on the stovetop results in even heat throughout the pan, for a more even sear on the steak. Turning the heat down to medium-low on the stove ensures that the crust doesn’t get too thick or dried out.
An evenly cooked interior, with no gray band of overcooked meat just under the surface
Adding a relatively large amount (2 tablespoons) of oil to the pan means the steak is always in contact with heat, so all parts sear evenly. Flipping the steak every 2 minutes and reducing the heat partway through cooking produces an interior that is evenly cooked throughout.

This is a members' feature.