America's Test Kitchen LogoCook's Country LogoCook's Illustrated Logo
Behind the Recipes

Pizza al Taglio

Tender and airy yet substantial, this Roman pie is often topped like an open-faced sandwich. It’s also one of the easiest pizzas you’ll ever make.
By

Published Jan. 30, 2019.

Pizza al Taglio

My Goals and Discoveries

Airy, tender inner crumb

Lots of water creates tenderness and bubbles in the crust. A long fermentation period and gentle handling during the shaping stage also help create an airy crumb.

Crisp, delicate bottom crust

A generous amount of oil in the dough helps it crisp as it bakes. We also bake the pizza on the lowest rack of the oven so that the underside cooks quickly.

Evenly thick crust that fills the baking sheet

We proof the dough in a baking pan and then invert it onto a baking sheet to bake. This way, the dough is already close to its final dimensions and only minimal handling is required to stretch it to the edges of the sheet.

Recipe

Pizza al Taglio with Arugula and Fresh Mozzarella

Tender and airy yet substantial, this Roman pie is often topped like an open-faced sandwich. It's also one of the easiest pizzas you'll ever make.
Get the Recipe

In a small, unassuming pizzeria in a shopping plaza on the outskirts of Rome, I ate the greatest slice of pizza I’ve ever had. It was rectangular, about ¾ inch high, slicked with a nearly imperceptible varnish of tomato sauce, and topped with soppressata, oozy provolone and mozzarella cheeses, and paper-thin slices of potato. The sauce, soppressata, and cheeses combined for a salty-savory punch, and the potatoes—not something I would normally think to include on pizza—were lightly crisped, browned, and curled at the edges. But the best part of this pizza was the crust: full of irregularly sized holes, tender and chewy in equal measure, with an audibly crisp yet delicate bottom and a yeasty, tangy, complex flavor.

This memorable slice turned out to be a Roman invention known as pizza al taglio. Though it’s baked in rectangular pans and cut into slabs like Sicilian pizza, its bubbly crumb and delicately crisp bottom bear more of a resemblance to good focaccia. And though the toppings on the slice I enjoyed had been applied before the crust went into the oven so they could cook and brown, pizza al taglio can also resemble an open-faced sandwich, with fresh or uncooked items such as salad greens, soft cheeses, or cured meats piled on when the crust comes out of the oven. Roman pizzerias adorn it in a variety of ways and display it behind glass in deli-style cases, where it is sold by the length and cut with scissors (al taglio means “by the cut”).

The Refrigerator: A Good Flavor Incubator

When dough is left to ferment, the yeast consumes sugars in the wheat, producing primarily alcohol and carbon dioxide, which gives the dough proper rise. Numerous organic acids are also produced that, like alcohol, contribute flavor. At room temperature, the fermentation happens fast: The yeast eats all the sugar it can find in just a few hours, creating carbon dioxide and alcohol but a minimal amount of the flavorful acids. When we put the dough in the refrigerator to ferment instead, the cold slows and alters the yeast’s metabolism, so it ferments the sugars more slowly, which creates more of the flavorful acid byproducts. Meanwhile, enzymes turn more of the flour’s starch into sugars, giving the yeast more raw material to work with. Over the course of a 16- to 24-hour rest, the yeast produces more and more flavor compounds. The result is better-tasting crust (or bread).

Dealing with Dough

The challenge to creating my own version of al taglio would be designing a crust that was substantial—strong enough to support all those toppings—yet also characteristically tender and airy. The few recipes I found for al taglio dough aimed to do this through two interrelated approaches: high hydration and long fermentation.

Putting lots of water in the dough serves two main functions. One, it aids in gluten development by helping the proteins in the flour find each other more easily than they would in a drier dough, so they can more readily align and form the cross‑links necessary for good structure. Two, it makes the gluten strands more flexible, which in turn allows them to stretch and expand during baking to produce an airy crumb full of large and small holes. (Drier doughs, on the other hand, tend to have tighter crumbs with smaller holes.)

A long, cool fermentation of at least 16 hours also serves a couple of functions: At lower temperatures, the yeast produces more of the desirable acids that give bread better, more complex flavor than it does at room temperature (see “The Refrigerator: A Good Flavor Incubator”). And though shorter rests help strengthen gluten, longer rests actually loosen the gluten structure, making it more flexible and the crust more tender.

With all that in mind, I put together a working recipe. Averaging ingredient amounts I’d found in other recipes, I settled on a 75 percent hydration level (meaning 75 grams of water for every 100 grams of flour), 1 tablespoon of olive oil, 1 teaspoon of instant yeast, and 1¼ teaspoons of salt.

All pizza al taglio doughs are mixed by hand and folded to develop gluten. (In a stand mixer, the dough hook has trouble gaining purchase on such a wet mixture, and kneading takes longer.)  So, to make the dough, I stirred together bread flour with the yeast, water, and oil in a bowl with a wooden spoon until no dry flour remained. I covered the dough and let it rest for 10 minutes. This quick rest—known technically as an autolyse—lets the flour absorb water and encourages gluten development to begin before the salt—which would inhibit both—is added. Then I stirred in the salt and let the dough sit for another 30 minutes.

Though most pizza recipes these days use a stand mixer to make the dough, all the al taglio recipes I found did it by hand. Furthermore, instead of kneading the dough, they simply folded it over itself several times, let it rest, and then repeated the folds and the rest one or two more times.

I loved how simple and low-tech this approach was, and I followed suit: I stirred together bread flour, yeast, water, and oil in a bowl with a wooden spoon until no dry flour remained. I covered the dough and let it rest for 10 minutes. This quick rest—known technically as an autolyse—lets the flour absorb water and encourages gluten development to begin before the salt (which would inhibit both) is added. Then I stirred in the salt and let the dough sit for another 20 minutes.

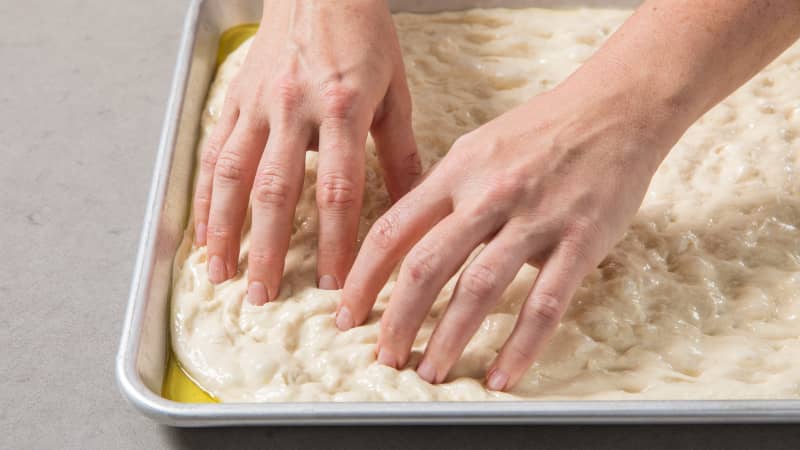
It was time to fold. After wetting my hands to prevent the dough from sticking to them, I gently lifted the edge of the dough and brought it to the middle, repeating these folds all the way around the dough. Once again, I covered it and let it rest. After 20 minutes, I gave the dough another set of folds. These simple movements, in combination with time, were a surprisingly effective way to build gluten in this wet dough. (When I compared kneading the dough continuously in a stand mixer for 10 minutes and then letting it rest for a similar total time, not as much gluten developed and the dough baked up into a flatter, less airy crust. To understand why, see “Hand versus Machine.”) The dough was now smooth and supple; it was also starting to show plenty of yeast activity. I then covered the bowl with plastic wrap and placed it in the refrigerator to ferment overnight.

After its overnight rest, I brushed the top of the dough with oil, turned it out onto a baking sheet liberally coated with vegetable oil spray, and stretched it as best I could toward the corners of the sheet. I covered the dough and let it proof at room temperature until it was slightly puffy, which took about an hour. I brushed on a simple tomato sauce and, to give the dough’s moisture more time to cook off, baked it in the middle of a 450-degree oven instead of the usual 500-degree oven. I hoped a lower temperature (and thus a longer baking time) would mean that the bottom of the crust would crisp sufficiently without a baking stone. After about 25 minutes, the bottom was reasonably crisp and the top was browned.

Making a Good Thing Better

The crust from this first go-round wasn’t bad. It had great flavor, good stature, and a decent mix of large and small alveoli (air pockets). But it wasn’t quite as light and tender as I wanted it to be. There were also some mechanical issues that needed fixing. Even after sitting in the baking sheet for an hour, the dough was a little elastic and thus hard to fully and evenly stretch over the surface of the sheet.

Proofing the dough in a baking pan gives it more room to spread out than proofing in a bowl. We then turn it out onto a baking sheet.
Dimpling the dough gently with our fingertips pushes it to the edges of the baking sheet while also preserving its bubbles.

To improve the crust’s texture, I started by increasing the amount of water. At 80 percent hydration, it was definitely lighter, airier, and more tender. And 85 percent was even better, but at that point it was a very sticky dough that was challenging to work with. So I settled on 82 percent—12 ounces of water and 14 2/3 ounces of flour—as an easier-to-handle compromise.

I also upped the olive oil in the dough from 1 to 2 tablespoons. That’s because fat lubricates the gluten strands, making them more flexible during proofing, which allows larger alveoli to form without bursting. It also increases tenderness.

With a solid dough formula in place, all that remained was to look at improving my shaping and baking approach. Though the dough was plenty relaxed from its long slumber in the refrigerator, all the manhandling I did trying to stretch a round ball into a wide rectangle tightened up the gluten and made the dough prone to springing back from the edges of the sheet and hard to shape into an even thickness.

Hand versus Machine

With most pizza dough, kneading in a stand mixer or food processor is an efficient way to develop gluten, the network of protein strands that gives bread structure. But for our pizza al taglio dough, we follow tradition, using a series of rests and two sets of folds to create structure. These folds—and the rests before, during, and after folding—are actually more effective at building gluten in this very wet dough than kneading continuously in a stand mixer and then letting the dough rest for a similar total time. The rests give enzymes in the dough time to snip gluten strands into smaller pieces that line up more easily and form cross-links. While the folds build on this activity by laying the nascent sheets of gluten on top of each other, the dough hook has a hard time catching the wet mixture and pulls it more haphazardly around the mixer bowl, so less gluten develops.

What if I started out with something more rectangular in shape? Instead of fermenting the dough in its mixing bowl overnight, I moved it to a baking pan (coated with vegetable oil spray first) and pressed it into an oval before wrapping the pan and placing it in the refrigerator.

Once we invert the dough onto a baking sheet, the top of the dough becomes its underside. Coating it with a generous amount of olive oil first ensures that it crisps nicely in the oven.

The next day, I once again brushed the dough with oil, inverted an oiled baking sheet on top of it, and then flipped everything. With a bit of coaxing, the dough fell out of the pan and onto the sheet, fully relaxed and more than halfway to its final dimensions. At that point, it was easy to stretch the rest of the way by gently dimpling the dough and dragging it toward the corners of the sheet. Best of all, I didn’t have to press the dough much, so it retained all the irregular alveoli that had formed during proofing, resulting in the best crust yet. (If you’re wondering why I didn’t just proof the dough in the baking sheet the whole time, there’s a good reason: The dough needs plenty of oil on its underside to prevent sticking and to help it crisp on the bottom. The oil also needs to go on just before baking so that it doesn’t get absorbed by the dough.) Finally, to get the bottom to crisp up a little more, I moved the sheet from the middle of the oven to the lowest rack, closer to the heat source.

Nearly anything you might want to put on top of bread—or in between two slices of it—can work as an al taglio topping. I topped one version with arugula, fresh mozzarella, and Parmesan when it came out of the oven. I piled prosciutto, fresh figs, and ricotta salata on another. To re-create that epic slice from Rome, I layered a third version with soppressata, provolone, and potato slices.

I’d never pass up a chance to go back to that pizzeria in Rome. But now that I have my own “pizza by the cut,” I don’t have to.

Pizza al Taglio with Arugula and Fresh Mozzarella

Tender and airy yet substantial, this Roman pie is often topped like an open-faced sandwich. It's also one of the easiest pizzas you'll ever make.
Get the Recipe

Pizza al Taglio with Potatoes and Soppressata

Tender and airy yet substantial, this Roman pie is often topped like an open-faced sandwich. It's also one of the easiest pizzas you'll ever make.
Get the Recipe

Pizza al Taglio with Prosciutto and Figs

Tender and airy yet substantial, this Roman pie is often topped like an open-faced sandwich. It's also one of the easiest pizzas you'll ever make.
Get the Recipe

0 Comments

This is a members' feature.