My Goals
- Well-seasoned meat
- Moist, tender texture
- Efficient cooking time
- Flavorful, velvety gravy
Published Nov. 1, 2017.

When brisket is done right, there is perhaps no better cut of beef to braise, especially when serving a crowd. It’s beefy, velvety, and moist, and it slices beautifully. The braising liquid can be seasoned with any aromatic vegetable, herb, or spice, and during the long cooking time, it reduces to a rich-tasting jus or full-bodied gravy. The final product is ideal as a Sunday dinner for family or for company.
Most recipes follow more or less the same script. Brown the meat, usually in a Dutch ovens; set it aside; and then cook aromatics (usually including loads of onions) until softened and browned. Return the brisket to the pot, add enough liquid (wine, beer, water, stock, tomatoes, etc.) to partially submerge it, and braise it, covered, in the oven until the meat is fork-tender and easily sliced. Many recipes, particularly classic Jewish versions, call for adding vegetables or fruits late in the process to be served alongside the meat.
Anyone who’s made brisket knows that producing fork-tender meat takes a long time—upwards of 5 hours, according to the recipes I’ve tried. But more problematic is the fact that by the time the meat is tender, it’s usually dry, too. That’s because brisket is loaded with collagen, the main structural protein in meat that makes it tough. Collagen requires long, steady heat exposure to break down, but in that time the meat’s muscle fibers are also contracting and squeezing out moisture. So in a sense, braising meat is a balancing act: using enough heat to break down collagen while still keeping the heat low enough to retain moisture.
I was determined to produce brisket that was both tender and moist. And while I was at it, I’d see how I could dress up the flavors so the dish would feel special enough to serve at the holidays.

Butchers typically divide whole briskets into two cuts, the point and the flat. I would go with the flat cut, which is available in most supermarkets and, as its name suggests, is flatter and more uniform and thus easier to slice.
When we want meat to retain moisture, our first move is almost always to apply salt, which not only seasons the meat but also, if left on long enough before cooking, changes the protein structure so that the meat better holds on to moisture. Brisket is particularly dense, so to help the salt penetrate, I halved the brisket lengthwise to create two slabs (doing so would also speed cooking and make for more-manageable slices) and poked each slab all over on both sides with a skewer. Even so, after a series of tests, I determined that the meat tasted juicier and better seasoned when the salt had at least 16—or up to 48—hours to work its magic.

On to the cooking. For the time being, I skipped searing the meat, which is messy and time-consuming, and focused on enlivening the braising liquid instead. I started by sautéing onions and garlic in a Dutch oven, and I made an unconventional choice for the braising liquid: pomegranate juice. Its acidity would balance the unctuous meat, and its fruity flavor would be a nod to traditional Jewish versions. I added some chicken broth and bay leaves along with the juice and brought the liquid to a simmer. I then added the brisket with the fat cap facing up so that the bulk of the meat would be submerged and the exposed part would be protected by the fat. I covered the pot and placed it in a 325-degree oven. After about 5 hours, it was tender but—despite having salted it for 48 hours—still too dry.
Brisket pairs well with a variety of braising liquids, including dry red wine, pomegranate juice, or beer (preferably a light-bodied American lager). When reduced, each of these liquids also produces a well-balanced sauce.
I reasoned that reducing the oven temperature would prevent the meat from drying out as much, even though I knew that it would add to the cooking time. I dropped the temperature from 325 degrees to 250 degrees—but now the brisket took far longer to cook than I would ever have expected. In fact, after 6 hours, the brisket still wasn’t even remotely tender, and when I took its temperature, I was surprised to see that it never exceeded 165 degrees. That wasn’t hot enough for significant collagen breakdown, which happens most rapidly above 180 degrees, so the meat never tenderized.
Puzzled as to why the meat’s temperature had plateaued, I did some research and discovered that this issue is familiar to anyone who has barbecued large pieces of meat. As meat gets hot enough for moisture to be driven off, its surface cools, preventing the interior of the meat from getting any hotter. Known as evaporative cooling, it’s the same process that happens when you perspire: As water on your skin evaporates, your skin’s temperature decreases, which in turn keeps your internal body temperature stable.
There are only two ways to overcome evaporative cooling in meat: Prevent moisture from being driven off by wrapping it tightly in foil, as is often done when barbecuing large cuts (not an option when braising), or limit how much the meat can cool by turning up the heat. If the meat can’t cool too much on the outside, it can continue to heat up on the inside.

Since evaporative cooling starts to kick in at about 160 degrees and collagen breakdown happens fastest above 180 degrees, my charge was clear: I needed to hurry the meat into that rapid collagen breakdown zone (180 to 200 degrees) and hold it there long enough for the collagen to completely break down.
I started my next braise in a 325-degree oven, as I had before, but this time I waited until the meat’s temperature hit 180 degrees, about 1½ hours into cooking, and then lowered the oven to 250 degrees. At this point, any evaporative cooling on the exterior of the meat wasn’t enough to lower the meat’s internal temperature, and it continued to climb slowly. After another 2 full hours, the brisket’s temperature hit 200 degrees, at which point the meat was both fork-tender and still wonderfully moist.
Things were looking good: Instead of producing a dry brisket in 5-plus hours, I now had a method that cooked it perfectly in about 4 hours. All I needed to do was polish the sauce.
The collagen in brisket tenderizes faster at higher temperatures. Unfortunately, brisket also loses more moisture at higher temperatures. To achieve tender and juicy brisket in a reasonable amount of time (about 4 hours), the key is to hold the meat between 180 and 200 degrees. In this optimal temperature zone, collagen breaks down at a rapid pace, but the meat stays well below the boiling point of water (212 degrees), helping minimize moisture loss.
We assumed that the best method would be low-and-slow braising, but we discovered that if the heat is too low, the cooking can actually slow to a crawl. The cause of the slowdown is a phenomenon known as evaporative cooling, which works just like perspiration: Once the meat gets hot enough for moisture to be driven off, its surface cools, which in turn slows the rate at which its interior temperature rises. It’s a common—and more extreme—problem when barbecuing, where the temperature of the meat often stalls dramatically in the dry heat; in fact, “stalling” is a recognized term in barbecue circles. To demonstrate the effects of evaporative cooling and how we overcame it, we cooked three briskets three different ways in the oven.
COMPARING COOKING METHODS: ONE WINNER AND TWO THAT STALL
The curious thing was that the sauce was thin, not velvety and full-bodied. At first I didn’t understand why, since all that collagen in the brisket was supposedly breaking down and converting to gelatin, which typically gives the braising liquid a luscious, silky body. But then I did some more research on the collagen in brisket and made a surprising discovery: Most of the collagen in brisket doesn’t actually break down and convert to gelatin; it merely softens enough to make the brisket tender.
That being the case, I needed to find other ways to add body to the sauce. I started with the onions, some of which had practically dissolved during the long cooking time. To coax more of them into breaking down and thickening the sauce, I sautéed them from the start with a small amount of baking soda, which helps break down their cell walls. Then I strained the liquid to get a smooth consistency. I also stirred in some flour when I sautéed the onions and some powdered gelatin when I added the liquid to the pot, just to give the sauce more body.
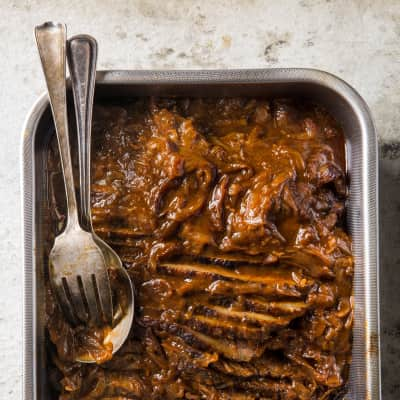
Instead of messily searing the brisket to produce deep savory flavor, we reduce the sauce in the roasting pan in the oven, creating a ring of richly flavored fond on the sides of the pan, which we stir into the sauce.
The combination produced a velvety sauce, but I wanted the liquid to taste even more meaty. I could get that by browning the meat, but I wanted to avoid this splattery step if possible and had a couple of ideas that would be less labor-intensive. First, I moved the braise from a Dutch oven to a large roasting pan, figuring that the broader surface would allow the braising liquid to reduce further and create more flavor-packed fond. To mimic the pot’s tight-fitting lid, I covered the roasting pan with aluminum foil. Next, I removed the foil cover partway through cooking so that the braising liquid at the edges of the pan and the portion of the meat that wasn’t submerged were able to brown. That worked, but it also slowed the cooking.
I fully cooked the meat without worrying about the sauce. I then set aside the meat, strained and defatted the sauce, and returned the sauce alone to a 400-degree oven. After 30 minutes or so, the sauce had reduced nicely and a dark ring of fond had formed on the sides of the pan. Once I’d stirred it into the sauce, this fond contributed the flavor of a well-seared brisket with none of the hassle. To polish those flavors, I added cumin, cardamom, and cayenne and black peppers, plus glutamate-rich tomato paste and anchovies; the anchovies don’t turn the sauce the least bit fishy if minced finely.

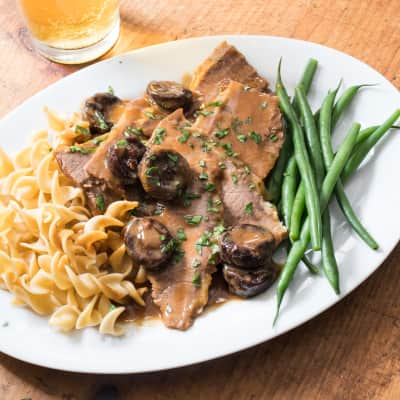
The results were my brisket ideal: tender and moist meat and a lush but well-balanced gravy. A handful of pomegranate seeds and chopped cilantro scattered across the top added tangy, fresh bursts and jewel-like color, turning this typically humble braise into a holiday-worthy centerpiece. I also created two variations, one in which I braised the meat in beer and paired it with prunes (which are often seen in classic Jewish versions), ginger, and Dijon mustard, and another, more classic version with red wine and thyme. Whether for company or family, this is a foolproof brisket recipe I’ll return to again and again.
Well-seasoned meat
Salting the brisket overnight (or for up to 48 hours) ensures that it’s seasoned throughout; salting also helps it retain moisture during cooking. Halving the meat lengthwise and poking it all over with a paring knife allows the salt to penetrate thoroughly; the narrower slabs cook more quickly and are easier to slice.
Moist, tender texture
Bringing the meat to 180 degrees in a 325-degree oven ensures that it starts tenderizing as quickly as possible. Lowering the oven temperature to 250 degrees once the meat registers 180 degrees helps the meat soften while expelling very little moisture.
Efficient cooking time
Bringing the meat into the collagen breakdown zone as quickly as possible cuts the traditional braising time (5 hours or longer) by at least an hour.
Flavorful, velvety gravy
Instead of searing the meat to create a more flavorful braise, which is messy and can be unwieldy with such a large piece of meat, we scrape the ring of deeply browned, flavorful fond from the edges of the pan into the sauce. This fond is produced when we reduce the braising liquid in the oven after the meat has finished cooking. We also cook the onions with baking soda, which helps them break down and dissolve in the sauce, and we add body to the sauce with gelatin and flour.

This is a members' feature.